June, 2016 - Photos & Graphics Tips
This page has now expanded to include all things "pictorial", which means not just photography but also the various graphic arts programs that you can use to manipulate images. I trust this change will make this page more useful to you.
Foggy Lenses Tackled The Practical Way
It's a hot day in South Florida. Leaving your air-conditioned room, you set out with your camera to capture some beautiful locales only to find your camera lens and eye piece all fogged up. You try wiping it off but it comes back with a vengeance. You have no choice but to wait it out. Exasperating, indeed. Now the fog appears because of the sudden change in temperature. The humid air in the atmosphere condenses and deposits on the cooler surface like your camera’s lens. Unfortunately, if you have a foggy lens, there is not much you can do. Keep wiping it off and wait for it to acclimatize. What you can do is to take measures to prevent your lens from getting fogged up. You can do that by making your camera and lens acclimatize beforehand. Here are a few tips on achieving it:
Keep your camera out at room temperature
If it is safe to put your camera and lens in the balcony of your condo, do it to acclimatize them. Or in any other safe place for half an hour or so. You can do it while you prepare to head out. Remember not to leave it overnight as overexposure to the humidity would not be good for your camera.
Take off the bag
When you are placing the camera and lens outside, take them out of their bag. Though the bag is not air-tight, it will maintain cool and dry air around the lens for a prolonged period. Consequently, the acclimatization will take more time.
Take off the filters and caps.
The most difficult place to remove condensation is the front part of the lens. When you are trying to acclimatise your camera, concentrate on this section the most. Remove any lens cap or filters attached to the lens. They will only prevent the humid, warm air from getting to the lens.
Keep your equipment in the trunk of your car
While you are taking a car to the place you are going to shoot, keep your camera and the lenses in its trunk. This will keep them at the outside temperature away from the cooler environs of the air-conditioned car and thus letting them acclimatize to the balmy weather. In case you want to keep them at hand for any spontaneous clicks, roll down the windows and switch off the AC. It will help them to acclimatize quickly to outside weather.
Carry a micro-fiber cloth
If the lens does get fogged up, wait for it to acclimate and keep wiping off the condensation. You will know when the fogging stops as the lens get acclimatized. If the condensation is mild, you can wipe it off and quickly click some shots before it reappears. This is usually feasible while you are waiting it out. Always carry a micro-fiber cloth to wipe off the fog. You can use the clip-on micro-fiber cloths which are easier to carry. Attach one to the strap of your camera.
Salvage it later on
If the pictures you have shot are very foggy, you need to accept that you cannot save them. But if the situation is not that bad, you can attempt to fix the little fogginess in the post-processing. The simplest way is to use Clarity slider in Lightroom or ACR (Adobe Camera Raw) to increase the contrast and the clarity of the picture. It will help a bit. Or you can use LAB Colorspace in Photoshop to enhance the colors of the foggy shot. This step will take away the dimness of the picture. These steps are not a guaranteed fix for hazy shots, but they might help a bit.
And finally…...
Fogged up lenses can waste a lot of potentially great shots and also the opportunities to capture them. The light conditions change swiftly, especially during sunrise and sunset. Keep wiping off the front of your lens to ensure that you don’t miss the opportunity when the light is at its optimal best. Be prepared and get that perfect shot.
Recovering Deleted Photos On Google+ - Found on an internet bulletin board
The other day, I took a really cute picture of my granddaughter. I then edited it on Instagram, and also shared the original on Facebook. It was one of my favorite pictures, because she was really cheesing it up.
Then, a few days later, I went back to my gallery and the picture was gone. No problem, I thought. I had already set up Google + to automatically back up my pictures. But when I looked, it was gone out of my Google+ Gallery too! Apparently, when cleaning out my pictures, I’d managed to accidentally delete this one from both locations. I was so upset, because I sometimes like to print my pictures, and the one saved by Facebook would only be a very small file size, and I’d changed the Instagram photo into black and white.
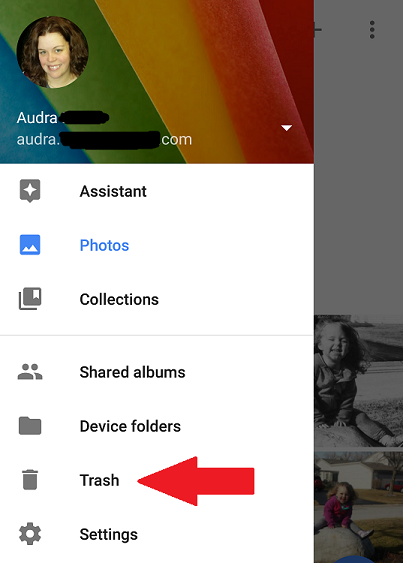
I looked up ways online to see if I could recover the picture, and even tried one method, but it didn’t work. I tried to see if my phone had a deleted folder or trash folder, but was unable to locate one. However, I did stumble upon one in Google+. I simply opened the Google Photos App and clicked on the menu button.
This brought up several options, one being Trash.
I found all the pictures I’d recently deleted. I simply opened the picture from the Trash, tapped the menu button on the picture this time, then had the options to Restore or Permanently Delete. Keep in mind the photos in your trash will be permanently deleted after 60 days, or if you choose the permanently delete option after tapping on the menu.
This did take a little time to completely restore, but once that process was completed, it appeared in not only Google+ photos, but my phone gallery as well. Now it’s also been backed up to my computer files so that if I want to print it out, it’s available on multiple locations and has less chance of being deleted.